For Trainers
Download the KAT trainer app to run your Kiwi Avoidance training sessions.
KAT app
The following page answers frequently asked questions for KAT trainers using the KAT app
-
WEB APP How to create a training session
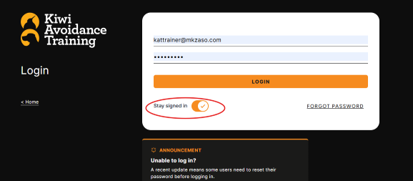
Go to https://kiwiavoidancetraining.nz/ and log in.
Tip: You can tick “Stay signed in” to allow for faster access across future visits
Select ‘Sessions from the navigation bar and click the orange ‘Add New Session’

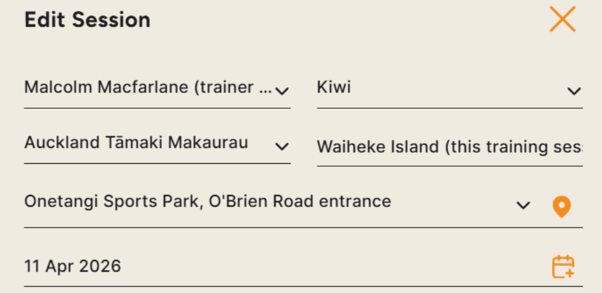
A pop-up will appear prompting you to enter details to create a session. Your name will automatically appear as the trainer.
Make sure all fields are completed before clicking save, otherwise the session cannot be created.
When filling in the “Address” field, you can include additional location details for the public to see before they make a booking. This information will appear on the main screen when searching for trainings in the area, and will also be included in the booking details (e.g. please do not park on the grass, or this session is for Waiheke residents only).


You can also choose the type of session you want to run (e.g. bookable, private, or open session).

A bookable session allows you to set a start time, end time, and training duration per dog. This will automatically create bookable time slots for the public to choose from once the session is published.
All time slots will appear with the word “break” shown above them. You can use this to add breaks, which will block those time slots so they cannot be booked.
As shown in the screenshot below, the session runs from 9:00am to 3:00pm, with 10-minute time slots per dog and a break at 12:00pm. A total of 35 dogs can be booked into the session.
Any additional information entered in the “extra instructions” field (e.g. site-specific directions, no dogs on heat, dogs must be over 6 months old) will be included in the booking confirmation sent to the dog owner.
A private session is by invitation only, such as for a hunting club or other closed group where the general public cannot book. The session still needs to be created so certificates can be generated. It will not be visible online, and it will not be open for bookings.
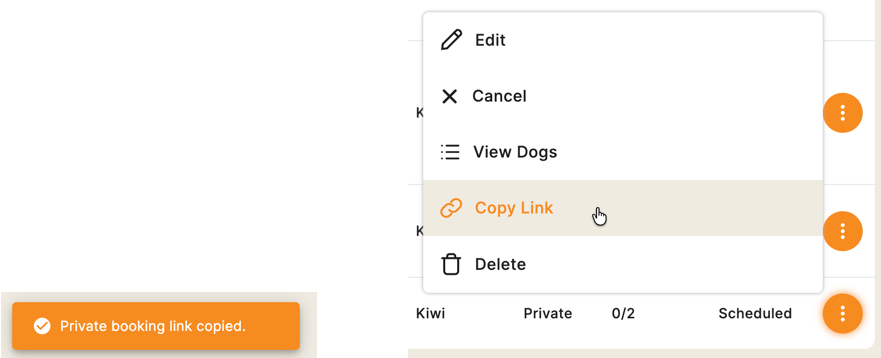
When a private session is created a booking link is generated. The trainer can share this link in a text message, email or FB post to clubs etc, then relevant dog owners will have direct access to the private booking page. This does not yet have the option of bookable slots, so the trainer will need to manage communicating with the owners the time they should arrive.
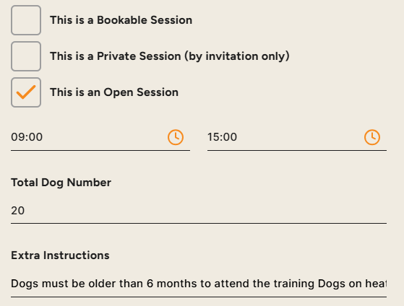
An open session allows you to set a start and finish time, along with the total number of dogs for the session. Dogs booked into this session do not have a set time—they can arrive at any point within the scheduled hours (e.g. 9:00am–3:00pm). Once the maximum number of dogs is reached, no further bookings can be made.
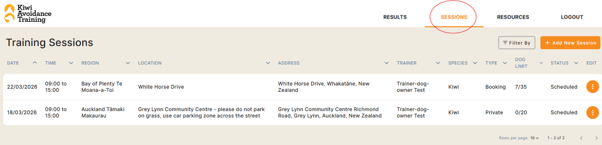
Once you have created your training session(s), they will be listed under the ‘Sessions’ tab on your personal dashboard.
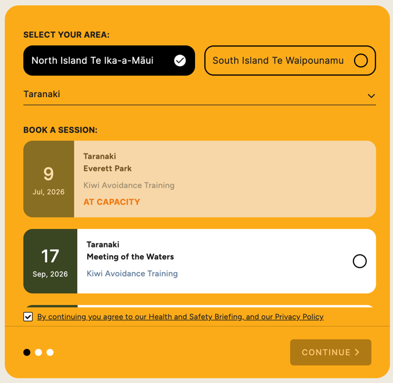
Once a session is fully booked, it will display on the webapp booking page as “At Capacity”. This allows the session to remain visible, but not bookable.
-
WEB APP How to enter results
To enter dog results (either on the day or afterwards), you first need to select the correct training session.
Go to the “Sessions” tab on your dashboard, where all past and upcoming training sessions are listed.
If you have many sessions, it is recommended to use the filter tool to quickly find the session you are looking for.
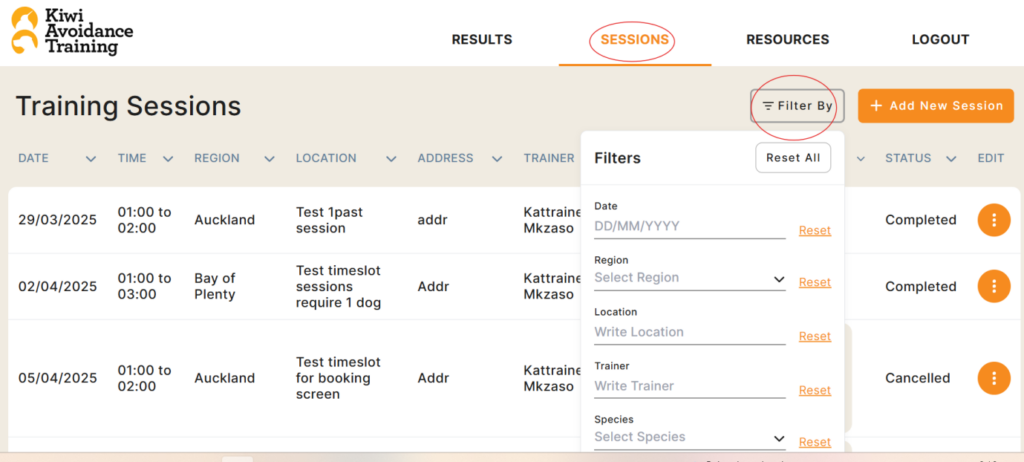
The ‘Filter By’ tool allows you to view all sessions created by every trainer using the app, not just your own. You can filter by date, region, location, trainer, species, and status.
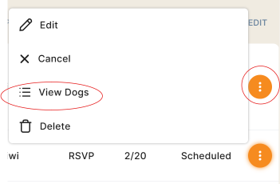
Once you have found the training session you are looking for, click the three dots under the edit tab and select “View Dogs.”
Next, click the three dots under “Actions” for the dog you want to enter results for, and select “+ Add Training Result.”
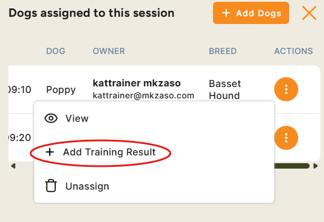
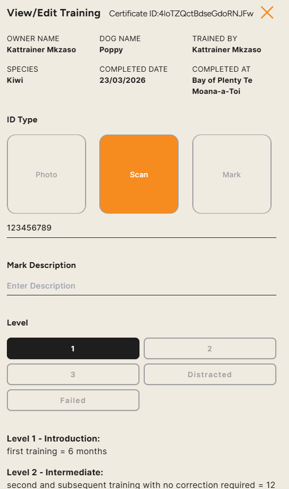
Here you can enter all the training results for your dog. (To update other details, such as ID, age, or sex, see the instructions further below.)
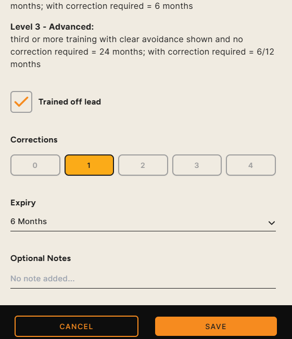
To enter the dog’s results, make sure you complete all required fields:
- Level: 1, 2, 3, Distracted, or Failed
- Trained off-lead: leave blank if the dog was trained on-lead
- Corrections: 0–4
- Expiry: this will populate automatically after entering the dog’s training result
- Optional notes: any additional information you want to record about the dog
- Dog ID information: add a photo, microchip scan, or mark if not already entered
Click Save once all results have been entered.
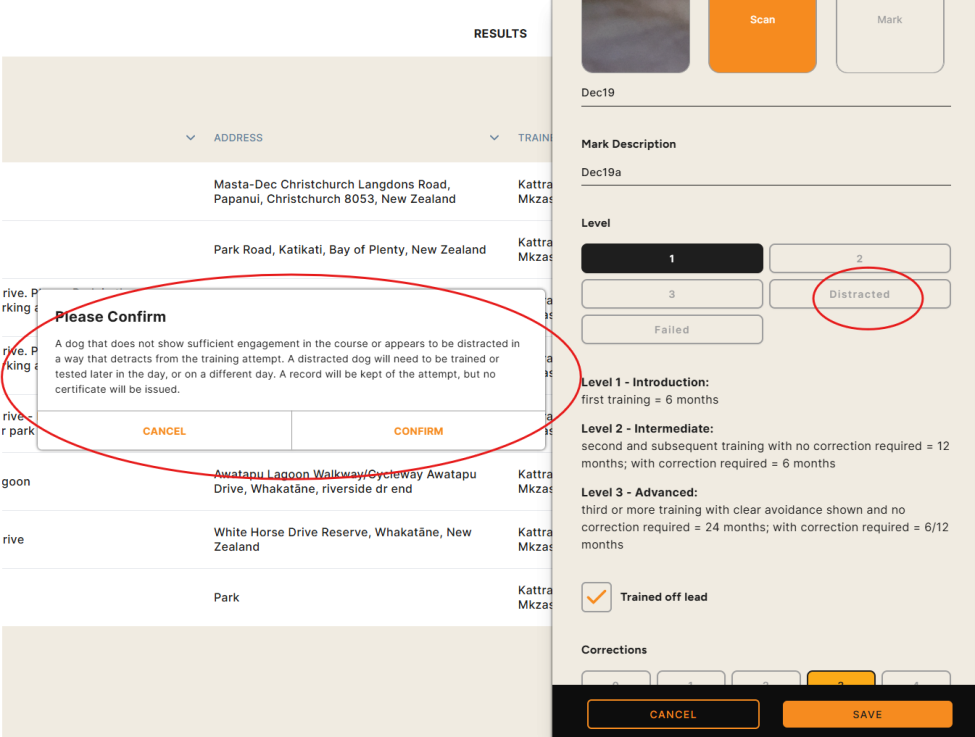
If you select “Distracted” or “Failed” under Level, a pop-up will appear with additional information to confirm your selection. Please read this carefully before proceeding. Dogs in either of these categories will not receive a certificate.
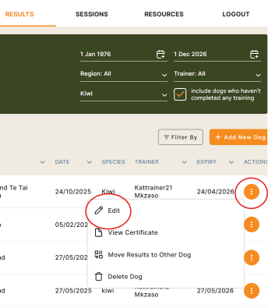
To update a dog’s details (such as age, sex, or breed), go to the “Results” tab and use the “Filter By” option. You can search by the dog’s name, owner, breed, or session to find the correct record.

Once the dog appears on the screen (it will automatically show as you apply the filters), click the three dots on the right-hand side next to its name, then select “Edit.”
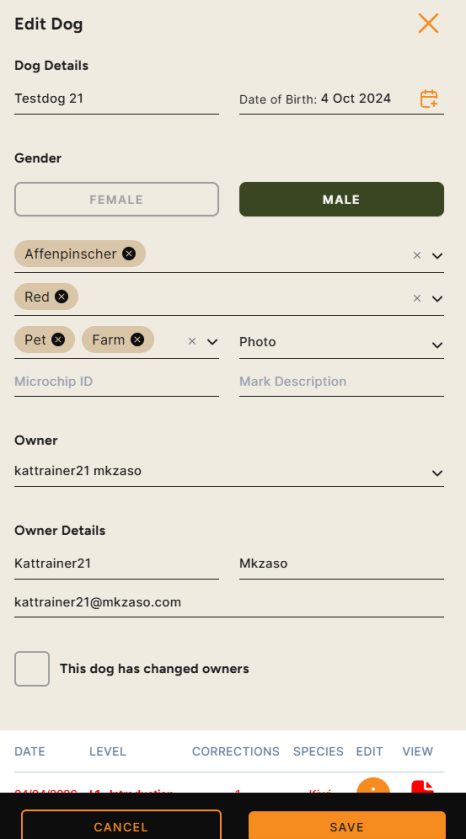
Here you can update various details about the dog, such as name, gender, breed, ID, and more. You can also change the dog’s owner by selecting the “This dog has changed owners” box. This will prompt you to enter the previous owner’s details, while you can update the current owner’s information in the fields above the checkbox. Be sure to click save after making any changes.
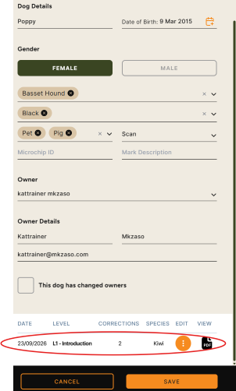
You can also view any certificates associated with the dog by scrolling to the bottom of the edit dog pop-up. Here, you can review previous results through the certificate(s) or edit past results if needed.
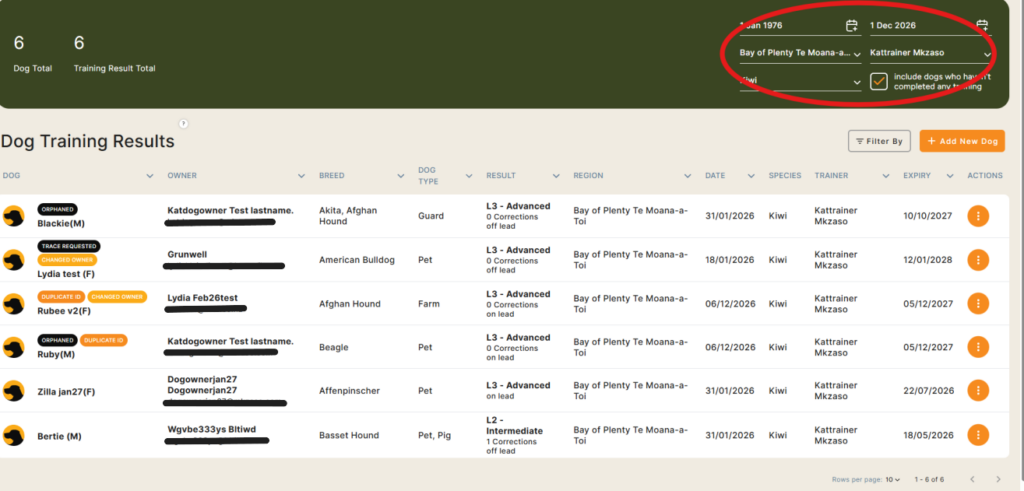
Another way to view a session’s results is by using the green filter at the top of the results screen. You can filter by date, region, trainer, and species. Results will automatically update as you select each option, there is no need to press enter.
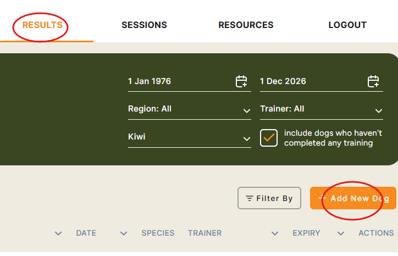
If a dog attending the session hasn’t been booked in, you will need to add them to the session.
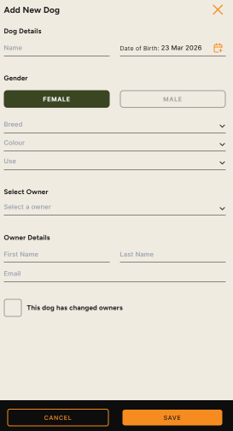
Go to the results tab on your dash board and click the orange ‘+ Add New Dog’ button.
A pop-up will appear where you need to fill in all the details, including the dog’s name, birthdate, gender, breed, colour, use, and the owner’s information. Once all details are entered, click save.
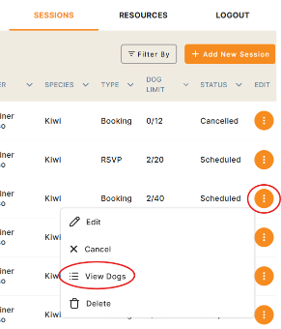
To add a new dog to a session, go to the “Sessions” tab and use the filter button to find your session, as described in the instructions above.
Click the three dots next to your session and select “View Dogs.”
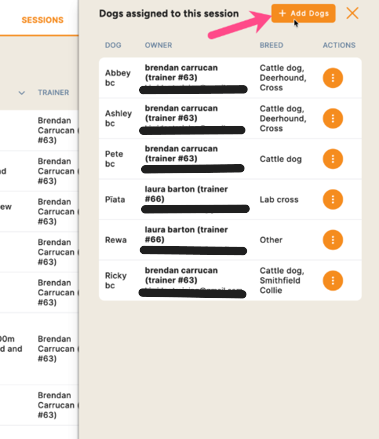
A pop-up will then appear, click the orange “+ Add Dogs” button.
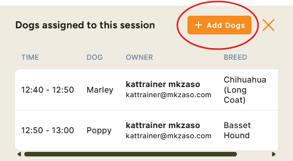
Here you can select or type in the dog’s name and the owner’s name using the drop-down boxes. If your session uses time slots, you will need to select a slot to add the new dog. If there are no available time slots, or you session limit is full, you will need to extend your session (see the troubleshooting section below).

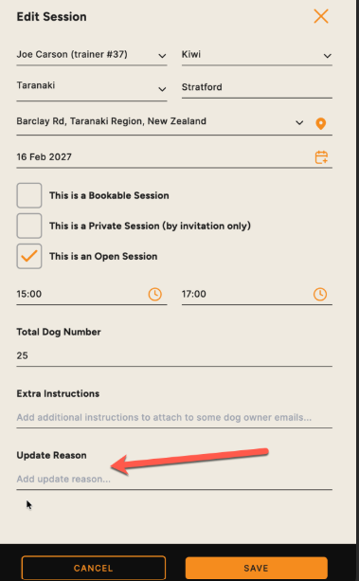
If you make updates to a session, you can choose to send a notification to all participants booked into that session. To do this, open the session and enter a message in the “update reason” field this will alert all participants.
If you do not want your changes to notify participants (for example, if you are simply extending the session time to add another dog), leave this field blank.
-
WEB APP How do I let the public know if I need to cancel a training?
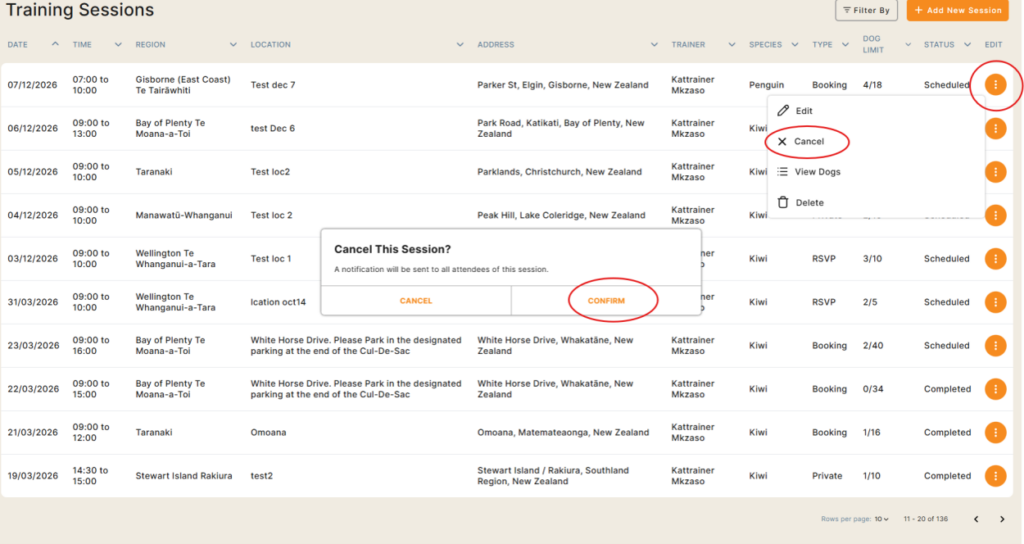
Select the session you want to cancel by clicking the three dots at the end of the session, then click “Cancel” and confirm in the pop-up box. An email will automatically be sent to the public notifying them of the cancellation.
-
WEB APP Can dog owners update their dog/s ID information?
No, this can only be done by trainers.
-
WEB APP Is the certificate sent to the owner as soon as I enter and save the training results for their dog?
Yes, the certificate is sent automatically as soon as the results are entered and saved, provided there is an internet connection. If there is no connectivity, the certificate will be sent automatically once the device is back in range, no further action is required. You can also download the certificate and email it to the owner if needed.
-
WEB APP Can I extend my session to allow for more dogs (e.g. walk-ins or additional dogs not originally booked)?
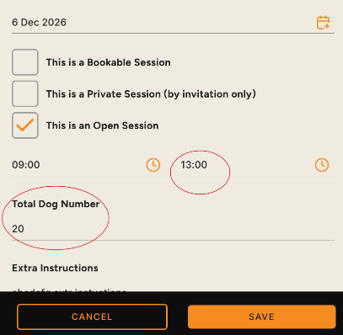
Yes. Select the session you want to update, click the three dots at the end of the session, and choose edit.

Once the pop-up opens, scroll down to “Total Dog Number” and update it to the number of dogs required. If needed, you can also adjust the session end time to allow for the additional dogs. Make sure to click save once you have made your changes.
-
WEB APP What notifications will I receive as a trainer?
As a trainer, you will receive notifications via your registered email address when sessions reach 80%, 90%, and 100% capacity. Don’t forget to also check the mobile app for any session request notifications.
-
WEB APP What notifications does the public receive?
The public receives the following notifications:
- Booking confirmation: immediately after booking
- Booking reminder: 3 days before the session
- Session cancellation: as soon as a trainer cancels the session
- Session updates: if any details are changed (e.g., address, notes)
- Retraining reminder: 28 days before a dog’s certification expires
- Certification issued: immediately after the trainer enters the training results for the dog
If the owner has more than one dog booked in for a session, they will get one notification per session (rather than one per dog).
-
WEB APP What is the filter button used for?
The filter button allows you to sort and view your training sessions based on different criteria, such as date, time, region, location, address, trainer, species, type of booking, dog limit, and status (completed or scheduled).
-
WEB APP Can I enter results after the training has been completed, for example the day after, if I recorded them but didn’t enter them during the session?
Yes, you can enter results after the training session. However, it is recommended to enter results during the session to avoid missing any information. You can also edit results if an error was made. If you do, a new certificate will be generated to ensure the updated information is captured for the dog’s owner.
-
WEB APP What information is held in the resources tab?
The resources tab contains information considered important for trainers, such as health and safety guidelines and informational flyers for the public. Trainers can only view this information, if you think something should be added here please email: [email protected]
-
WEB APP Can I, as a trainer, add an owner into the system on their behalf?
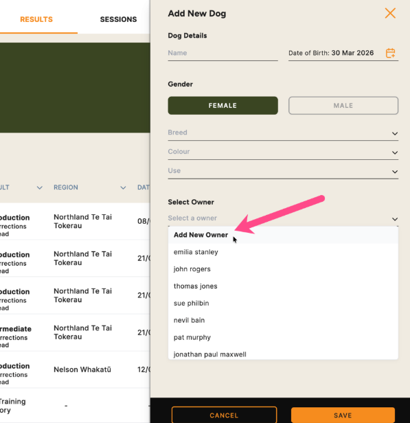
Yes. When you go to the ‘Add New Dog” section, scroll to the bottom. Under the “Select Owner” dropdown, you will see an option to “Add new Owner”.
-
WEB APP I want to search or make edits on the webapp. How do I view all the dogs for a particular owner?
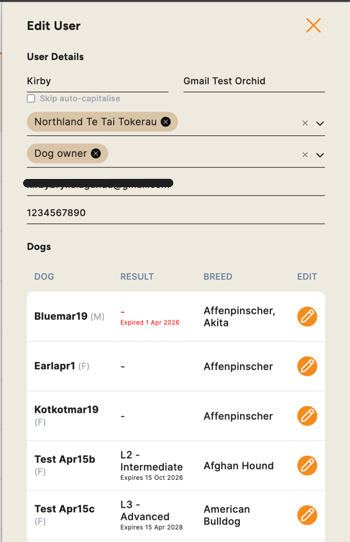
Navigate to the dog owner you are looking for, then tap edit to view all dogs associated with that owner profile.
-
MOBILE APP How to create a training session
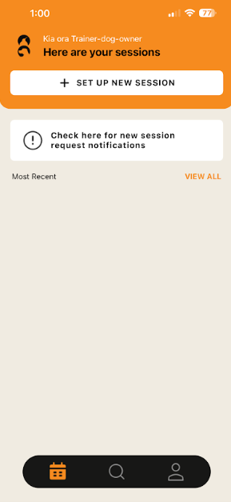
Once you have logged in, you will be taken to the home screen. Click the “+ Set Up New Session” button to create a new training session.
On this page, fill in all required details. If you are not creating a bookable session (e.g. a private or open session), the training length field will be greyed out and does not need to be completed.
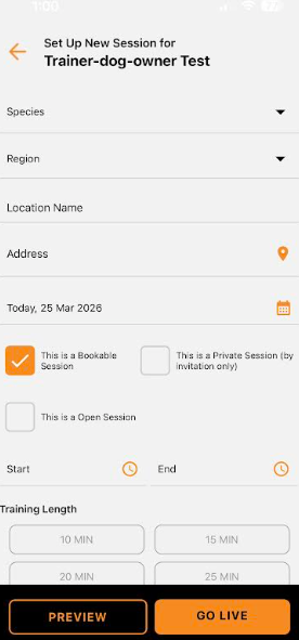
Once all details are entered, click the orange “Go Live” button.
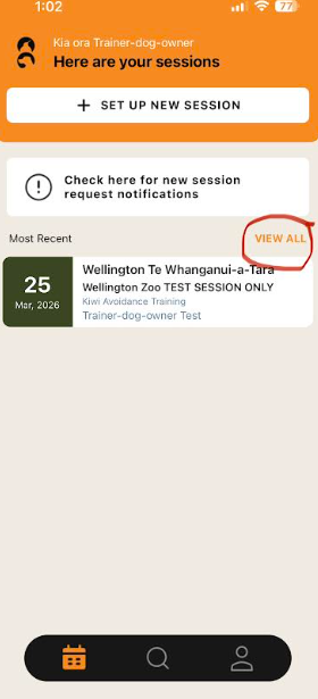
You will then be returned to the home screen, where your newly created session will appear. Any additional sessions you create will also be listed here. Click the “View All” button to see all sessions. When logged in on your phone, you will only be able to view the sessions you have created, not those created by other trainers.
-
MOBILE APP How to enter results
Once in your session, select the dog you want to enter results for. Enter all results on this screen, and make sure the dog’s ID details are included if they are not already recorded.
All required fields must be completed before you can submit the results:
- Level
- Trained on/off lead (tick the box only if the dog was trained off lead)
- Corrections
- Optional notes (if needed)
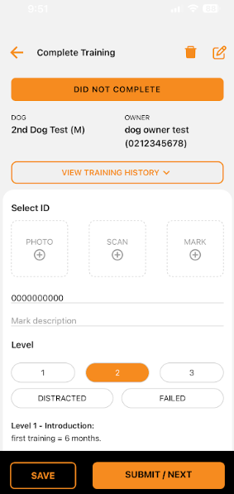
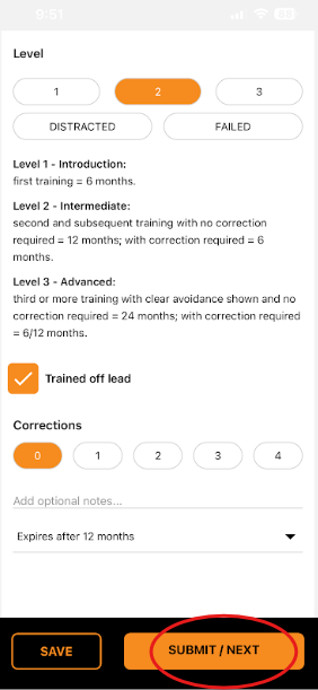
Note: When you select the level and number of corrections, the certificate expiry will automatically be calculated (e.g. 6, 12, or 24 months).
Once you have entered all the data, click the orange “Submit/Next” button. A certificate will be automatically generated and sent to the owners registered email address. The certificate has all the below information on, including the trainers details.
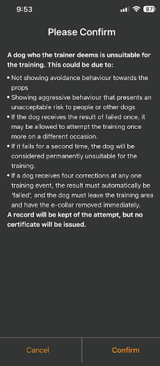
If the dog is marked as “Distracted,” a pop-up will appear. Please read the information carefully before selecting either cancel or confirm. Dogs marked as distracted do not receive a certificate.

If the dog failed the training, a pop-up will appear. Please read the information carefully before choosing either cancel or confirm. Dogs that fail do not receive a certificate.
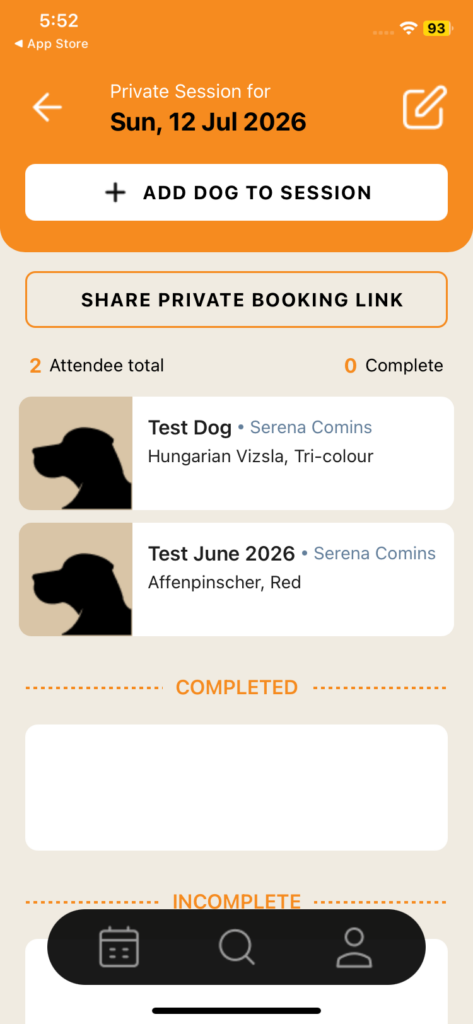
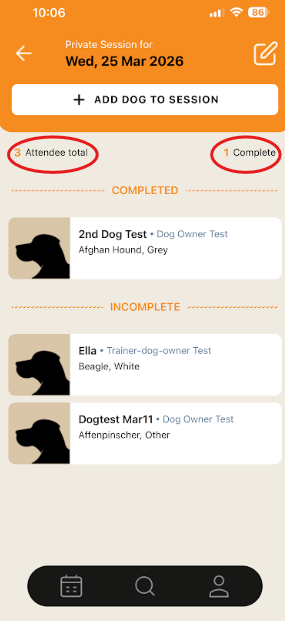
Once you click the “Submit/Next” button after entering results, you will be taken back to your home screen. Here, you can see which dogs have completed the training and which are still marked as incomplete (still to do the training or no shows). You can also view the total number of dogs in the session (Attendee Total) and how many have completed the training (Complete).
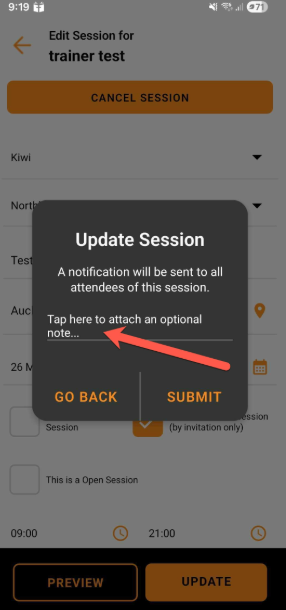
If you make updates to a session, you can choose to send a notification to all participants booked into that session. To do this, open the session and enter a message in the “update reason” field this will alert all participants.
If you do not want your changes to notify participants (for example, if you are simply extending the session time to add another dog), leave this field blank.
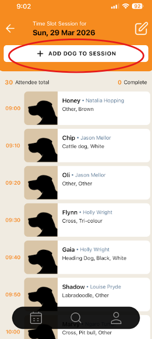
If a dog arrives as a walk-in on the day, you will need to add them to your current session.
Open your session where all booked dogs are listed, then click the “+ Add Dog to Session” button
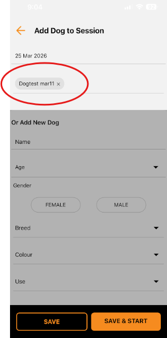
Here, you can search for a dog by the dog’s name or the owner’s name, or add a new dog if they are not already registered. Please note: if you add a new owner you need to ensure the email address is correct before saving. This is the unique identifier for the owner, and if it needs to be edited it can only be done so via the webapp.
Once you have found the dog in the system using the search, click the orange “Save & Start” button to enter results straight away, or click “Save” to add the dog to your session and enter the results later.
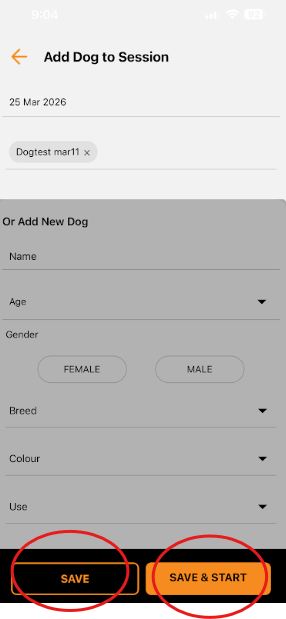
If you click the Save & Start button, this will take you to the screen where you can enter the dog’s ID details and training results.
If you choose to enter the results immediately, make sure all fields are completed, then click the orange “Submit/Next” button.
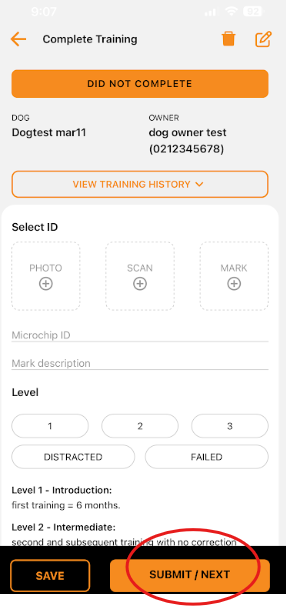
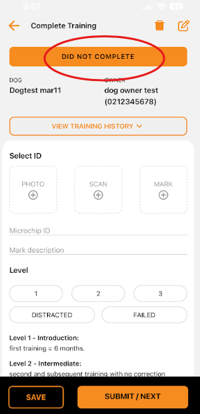
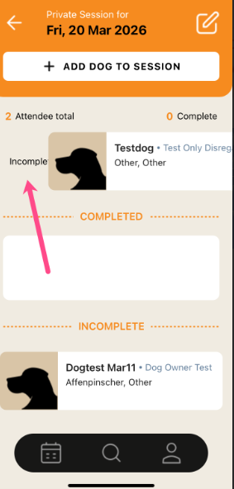
If a dog does not complete the training (e.g. did not attend or was a no-show), it must be marked as “Incomplete.” You can do this in two ways:
- Click on the dog, select the orange “Did Not Complete” option, and confirm when the pop-up appears.
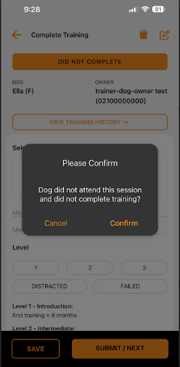
- Go to the main screen where all dogs are listed. Swipe the dog to the right— “Incomplete” will appear on the left side. A pop-up will then ask you to confirm that the dog did not complete the training.
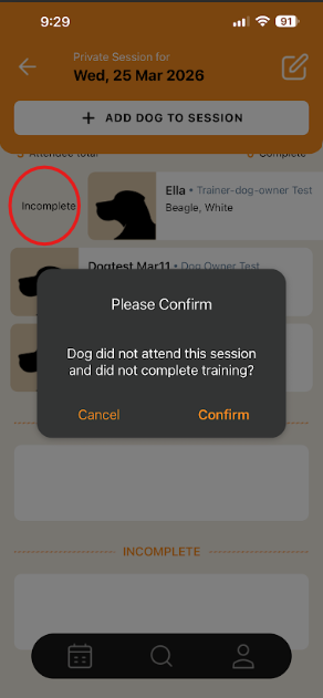
If a dog is marked as “Incomplete,” training cannot be completed for that dog. If this was done in error, swipe the dog to the left to move them back so the training can be completed. A pop up will appear asking you to confirm this change.

If you complete training outside of reception, your results will automatically sync once you return to reception.
To check if your data has synced, select “Cache & Sync Status” through the person icon. This will show the status of your data and also gives you the option to download data for offline use.
It is recommended to tap the sync button while connected to Wi-Fi or mobile data before going off-grid. Your data should automatically resync once you are back online, but it is a good idea to tap the sync button again to ensure everything has updated correctly.

-
MOBILE APP Can the public use the mobile app?
No, the mobile app is for trainers only. The public must register for sessions through the website.
-
MOBILE APP Can I edit or cancel a session after it has been created?
Before any dogs are booked:
- On the web app, you can edit everything, including the date.
- On the mobile app, you can edit everything except the date.
After a dog has been booked:
- You can increase the session time but not decrease it.
- You cannot change the session type.
To cancel a session on the mobile app, tap the edit session icon and then tap the cancel session button. Anyone already booked in will get a notification the session has been cancelled.

-
MOBILE APP Can I remove or delete a booking?
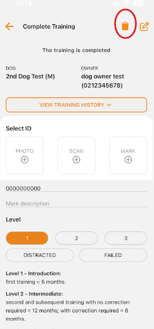
Yes. Select the dog you want to remove, then click the orange bin icon at the top right of the screen. A pop-up will appear asking you to confirm that you want to delete the booking.
-
MOBILE APP How do I edit a dog’s information, such as breed or colour?
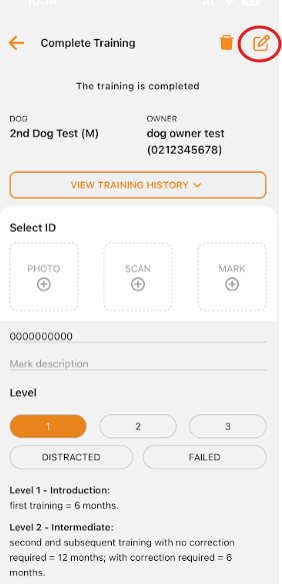
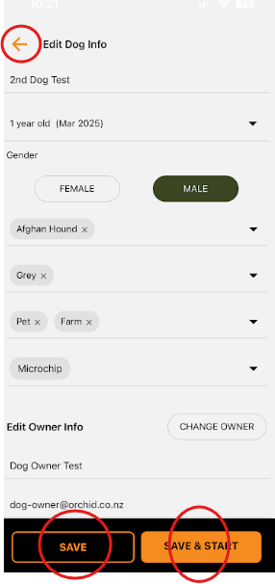
Go into your session and select the dog you want to update. Click the pen-and-paper icon in the top right corner to access all the dog’s information. You can make your updates and then either:
- Click “Save” and use the back button to return, or
- Click “Save & Start” to go directly to the dog’s results screen.
-
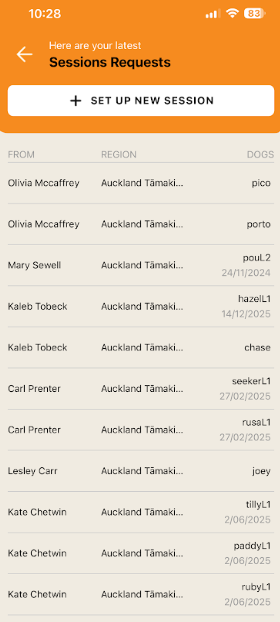
MOBILE APP What does the “Check here for new session request notifications” button mean?
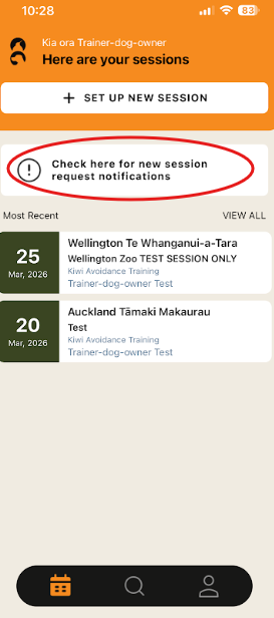
On your home screen, above your list of training sessions, you will see “Check here for new session request notifications.” This shows requests from people who want a session in a specific region (e.g., Auckland, Bay of Plenty, Wellington etc). You can use this information to create a new session if there is enough interest in that area.
-
MOBILE APP Is there an option to mark a dog as a “no show” if they don’t attend a session?
There isn’t a specific “no show” option, but you can mark the dog as “Incomplete.” You can quickly do this by swiping the dog to “Incomplete” during the session. Any dogs without results entered by the end of the session will also automatically be marked as “Incomplete.”
-
MOBILE APP What can’t I do on my phone that I can only do on the web app?
On your phone, some features are limited compared to the web app:
- Filtering is restricted to dog and owner details only.
- The Resources tab is not available on the phone.
-
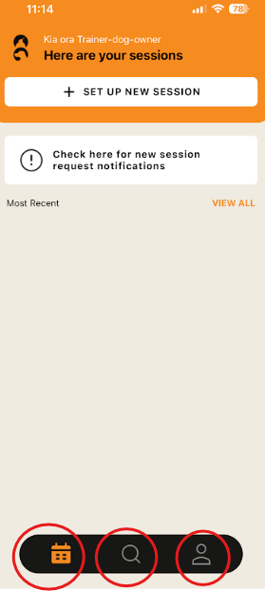
MOBILE APP What are the three symbols at the bottom of the home screen for?
- Calendar icon: Takes you back to your home screen where all your sessions are listed.
- Magnifying glass icon: This is the search function, allowing you to search for dogs or owners.
- Person icon: Here you can log out, switch to dog owner view, and sync your data if you have completed training outside of reception.
-
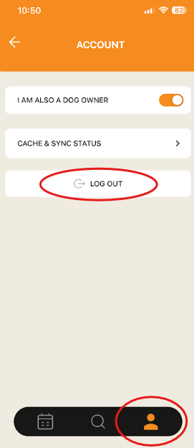
MOBILE APP How do I log out?
Click the person icon at the bottom of your main screen, then select “Log Out.”
-
MOBILE APP What can’t I do on my phone that I can only do on the web app?
On your phone, some features are limited compared to the web app:
- Filtering is restricted to dog and owner details only.
- The Resources tab is not available on the phone.
-
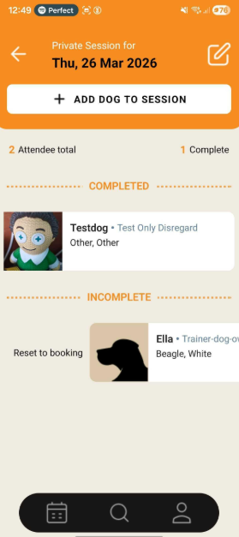
MOBILE APP My training has finished, but I haven’t uploaded my results yet and now I can’t, what do I do?
Once the event date and time have passed, all dogs are automatically moved into an “Incomplete” state. This allows the system to track “No Show” participants.
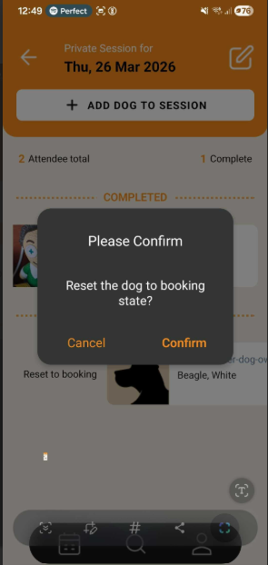
To upload your results, you’ll need to move the dog back into a “Complete” training state. Simply press and hold the dog’s profile card, then swipe left or right, this will open a popup where you can update their status
Tap to confirm that you want to reset the dog. Once this is done, you can tap on the dog’s profile card to add their training record without any issues.
-
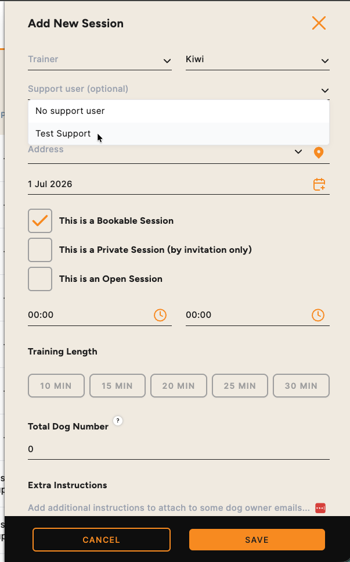
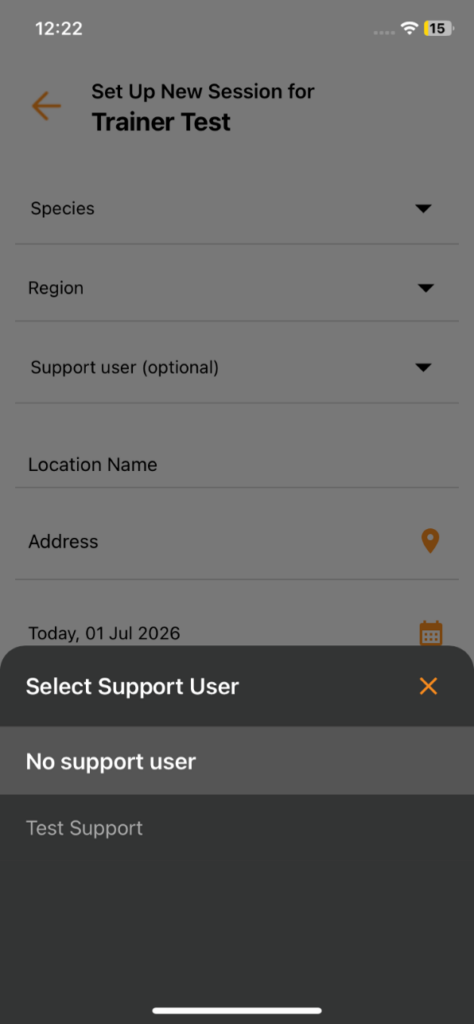
MOBILE APP How to I add a support user (for admin support at KAT events)?
New support accounts need to be added by app admin via the webapp (by either creating a new account, or amending an existing one).
The support user cannot create a session. The trainer must still create an initial session and assign a support user who can then provide full support once assigned. The trainer also has the option of not adding a support user.
The support role has session access on the mobile app only.
-
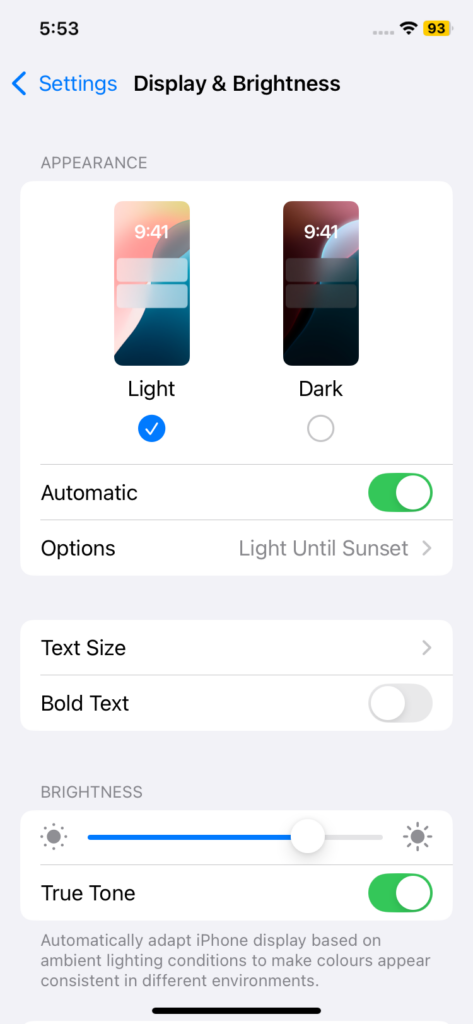
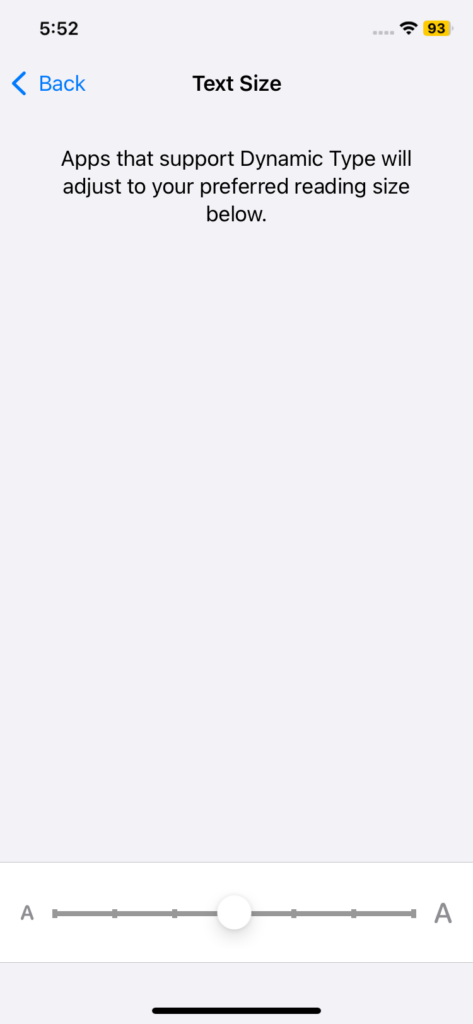
MOBILE APP The text is overlapping on the screen of my iPhone and I have lost functionality. What do I do?
Check to see if your phone was set up to increase font size in applications that implement dynamic text. Go to Settings, Display & brightness, select Text size, make sure the option in the slider is somewhere in the centre. Example screenshots taken from a 6.1” iPhone.